
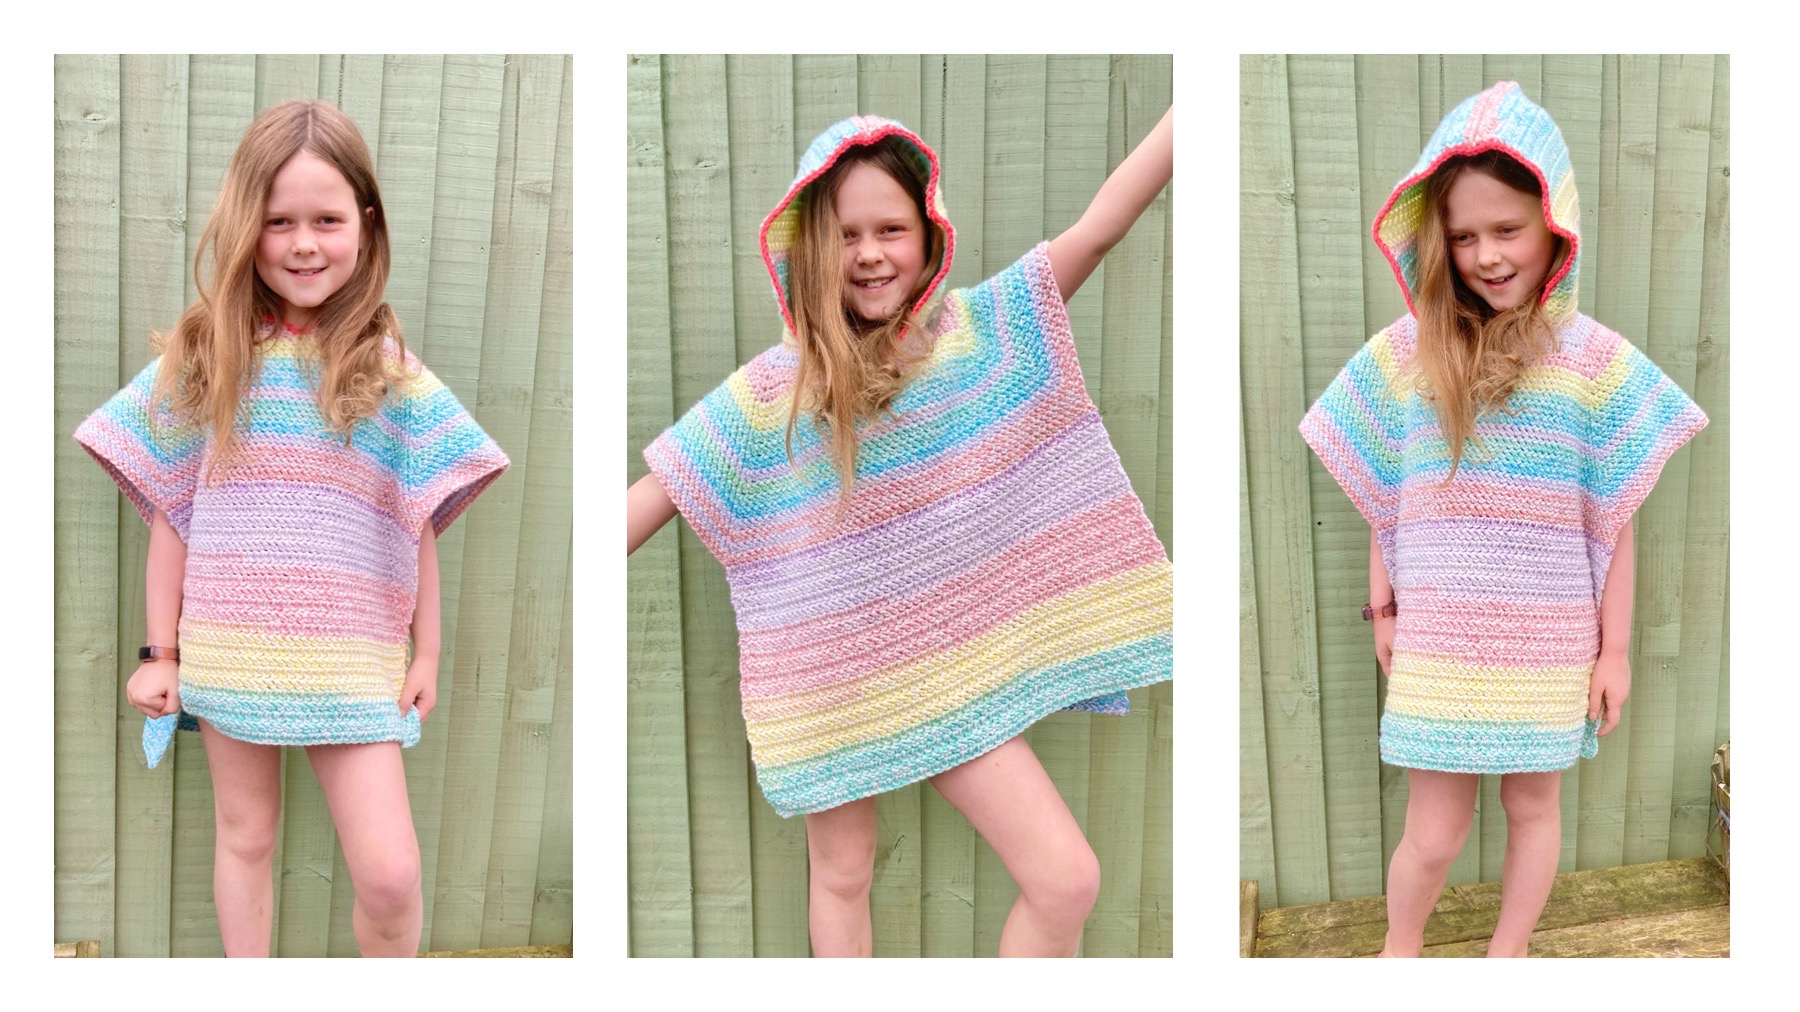
The kids Hooded Poncho is my latest pattern release. My daughter loves hers and wears it to her swimming lessons over her costume. Although this is a Summer version and can be used as a hooded towel, you could just as easily make this in a different colourway for Winter and layer it over a jumper and jeans.

I’ve used a lovely pastel rainbow self striping yarn for this version and I’m really pleased with how it’s turned out. The poncho is created ‘top down’ worked in the round for the yoke and sleeves and then worked in rows for the front and back panels. the hood is added afterwards. The first part of the yoke is done in hdc stitches and the rest in my favourite stitch Herringbone Double Crochet.
I decided to use a contrasting coral coloured aran yarn for the hood edging and I think it works really well.
I really hope you enjoy making this as much as I enjoyed designing it and I hope that your recipient is as pleased with it as mine was!
Size
Child – One size to fit ages 4-12
Gauge
10sts x 10 rows in herringbone double crochet
Suggested yarn
Papataya chunky yarn, in colour #5 self
striping pastel rainbow. 4 x 150g cakes. (buy extra if you need
your poncho to have more than 23 rows in the body panel)
Coral colour aran yarn for hood edging.
Size 6mm hook
4 stitch markers
Stitches Used
Ch – Chain (UK Chain)
Sl st – Slip Stitch (UK Slip Stitch)
Sc – Single Crochet (UK Double Crochet or Dc)
Hdc – Half Double Crochet (UK Half Treble Crochet or Htr)
Dc – Double Crochet (UK Treble or Tr)
Hbdc – Herringbone Double Crochet (Uk Herringbone Treble or Hbtr)
Yarn over, insert hook into next st, yo pull a loop though, 3 loops on hook. Pull
the loop just made through the 2nd loop on hook, yo pull through the same
loop, yo pull through both loops on hook.
Stsc – Stacked Single Crochet (UK Stacked Double Crochet) – sc in first st, then
sc in the side of the sc just made (see video tutorial to help with this stitch)

Yoke and Sleeves
Foundation Chain – Ch 61
Row 1) Hdc into 2nd ch from hook (counts as a st) and in the next 10 ch, 3 hdc in
next ch, hdc in next 6ch, 3hdc in next st, hdc in next 22ch, 3hdc in next ch, hdc in
next 6ch, 3hdc in next ch, hdc in last 11 ch.
Row 2) Turn your work DO NOT CHAIN, stsc into first hdc (counts as a stitch here
and throughout, see stitch guide above for how to make stsc), hdc in next 11 sts, 3
hdc in next st, hdc in next 8 sts, 3hdc in next st, hdc in next 24 sts, 3hdc in next st,
hdc in next 8 sts, 3hdc in next st, hdc in last 12 sts.
Row 3) Turn, Stsc into first hdc, hdc in next 12 sts, 3hdc in next st, hdc in next 10 sts,
3hdc in next st, hdc in next 26 sts, 3hdc in next st, hdc in next 10 sts, 3hdc in next st,
hdc in last 13 sts.
Row 4) Turn, Stsc into first hdc, hdc in next 13 sts, 3hdc in next st, hdc in next 12 sts,
3hdc in next st, hdc in next 28 sts, 3hdc in next st, hdc in next 12 sts, 3hdc in next st,
hdc in last 14 sts.
Row 5) Turn, Stsc into first hdc, hdc in next 14 sts, 3hdc in next st, hdc in next 14 sts,
3hdc in next st, hdc in next 30 sts, 3hdc in next st, hdc in next 14 sts, 3hdc in next st,
hdc in last 15 sts.
Row 6) Join the last st of row 5 to the first st of of row 5 with a slst and pull tight,
then turn the work down towards you to look at the back of the stsc st from row 5,
locate the 3rd loop (behind and below the ‘v’ that sits on the top of the stitch) and
slst in that loop, then locate the 3rd loop of the next st (hdc) and slst into that,
continue to slst into the 3rd loop along the back of the hdc sts until you reach the
corner st, which will be the 17th st on row 5, slst into the 3rd loop of that stitch too.
(refer to the video for clearer guidance on this step – link to video at the bottom of
the pattern).
Now work a sc into the regular ‘v’ of the next hdc st (18th st), then work a hdc in
the next st and a hbdc into the next st. This is how we will begin working
continuously in hbdc sts, amigurumi style for remainder of the yoke and sleeves.
Continue to work hbdc into each st until you reach the next 3hdc increase. Locate
the middle st of the 3 hdc and work 3 hbdc into that st. Mark the middle st of the 3
hbdc just made with a stitch marker (referred to as pm ‘place marker’ from now on).
*Continue to hbdc in each st until you reach the next 3hdc increase, locate the middle hdc and work 3hbdc into that st, pm in middle hbdc of the 3*, repeat from
*to* around until you reach the last st. Make 3hbdc into the last st and pm in middle st.
Now you will begin working in continuous amigurumi (spiral) rounds. Round 7
starts with a hbdc into the sc of the previous row, then a hbdc into the hdc, and from
then on you will work hbdc sts into each st around, making a 3 hbdc increase into
each marked st (remember to move your stitch marker to the middle of the 3hbdc
increase every time).
Rounds 8- 18 Continue to work around the yoke and sleeves in exactly the same
way as round 7. Once you reach the end of round 18, instead of increasing in the
marked st, make 1 double crochet st (this will keep the edges of the work straight
when you start working in rows).
Front and Back Panel
Row 1) Turn your work and stsc in first dc. Hbdc in each st across, placing an
ordinary dc in the last st (marked st from the yoke round 18).
Rows 2- desired length) Turn your work, stsc in first st, hbdc in each st, dc in last st.
Repeat row until your poncho reaches your desired length. The poncho in the photo
has 23 rows. *Note, if your poncho needs to be much longer you will need extra
yarn.
For the back panel, reattach your yarn in the marked st and follow row 2 until the
panel reaches your desired length.
Hood
Row 1) Make sure the poncho is the right side out. Re-attach your yarn in the first
ch of the original foundation ch (we are working into the other side of the chain
now). Stsc in the first ch, hdc in remaining 59 ch sts.
Row 2) Turn your work. Stsc in first hdc, hdc in remaining 59 sts.
Rows 3-27) Repeat row 2. Do not fasten off.
Making the Seam
FIRST TURN THE PONCHO INSIDE OUT – Fold the hood panel in half so that you have
30 sts lined up in front with 30sts behind, with your last st from the previous row
still on your hook in front. Ch1 and insert your hook through the first hdc AND the
hdc directly behind, yarn over and slst the 2 hdc sts together. Continue to do this in
all 30 pairs of hdc sts. Fasten off. Turn the poncho and hood the right way out again.
Finishing
To finish – Attach your coral aran yarn to the slst at the bottom of the neck split,
Ch1 and sc evenly around the edge of the hood, taking care not to make too many
stitches (this would cause the hood to become frilly), slst to the first ch1 and fasten
off. Sew in all your loose ends.
If you’d prefer to support me (thank you!) and buy the ad-free printable pdf version of the this pattern, which includes a link to the full video, follow this link:
Don’t forget to follow me on my social platforms for more free tutorials and patterns!
Leave a Reply